Skip to content
    Onze webshop is vanaf nu geopendNaar de webshop

    Preparation guide

    How to prepare your roof or stud wall for blown-in insulation

    You do the preparation, we blow in the insulation. This guide tells you step by step what to do. In doubt? Call us, it saves you work later.

    Allow 5 to 10 half-days for an average roof or wall.

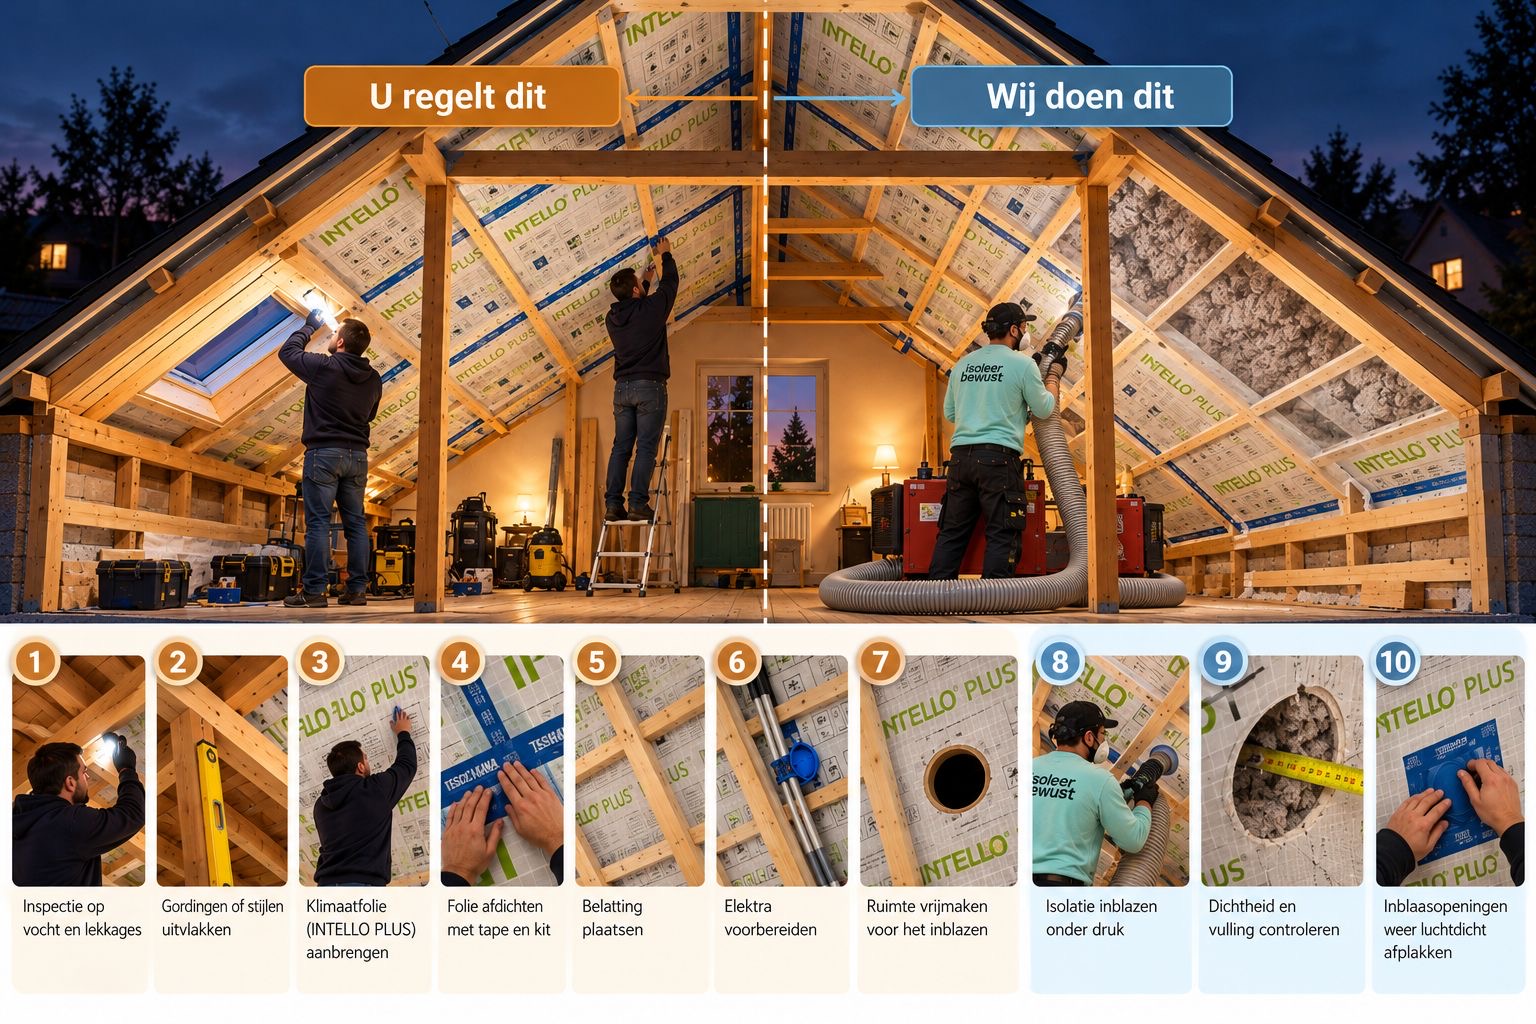
    Preparation for blown-in insulation: what you arrange and what we do
    A bit of Reinder Douwes and a bit of AI

    You take care of

    • Inspection for moisture and leaks
    • Levelling purlins or studs
    • Fitting the vapour membrane
    • Sealing the membrane with tape and sealant
    • Fitting battens
    • Preparing the wiring
    • Clearing the space for blowing

    We take care of

    • Blowing in insulation under pressure
    • Checking density and fill
    • Sealing the blowing holes airtight again

    Important: no staples when blowing in

    We advise against stapling the vapour membrane, even though the membrane itself says you can. Blowing puts pressure on the membrane and staples tear out. Every torn staple is a hole in your airtight layer. Fix the membrane temporarily with double-sided tape on the timber and screw the battens on straight away. The battens hold membrane and insulation in place.

    At what density do we blow in?

    MaterialDensity
    Cellulose45 - 55 kg/m³
    Wood fibre35 - 45 kg/m³
    Cardboard35 - 45 kg/m³
    Straw90 - 110 kg/m³

    Straw is heavier. For straw, use rafters and battens one size heavier than the table in step 2.

    1. How does the system work?

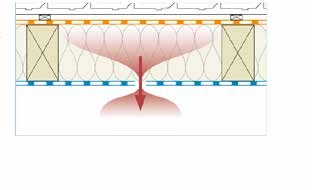
    Three layers work together. The inner two are your work.

    LayerWhoWhat does it do?
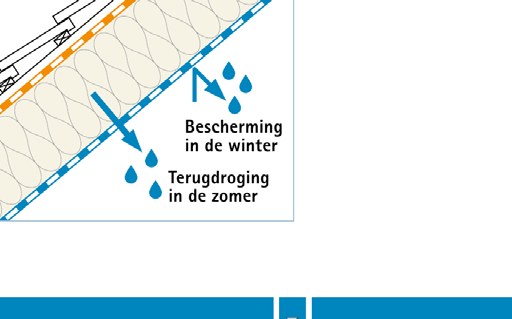
    Vapour membrane (Intello Plus)You, beforehandSmart vapour control: keeps moisture out in winter, lets it dry in summer (sd 0.25 to 10 m).
    Blown-in insulationUsFills every gap, no thermal bridges, good sound damping.
    Battens + plasterboardYouHold membrane and insulation, leave room for wiring and form the base for the finish.
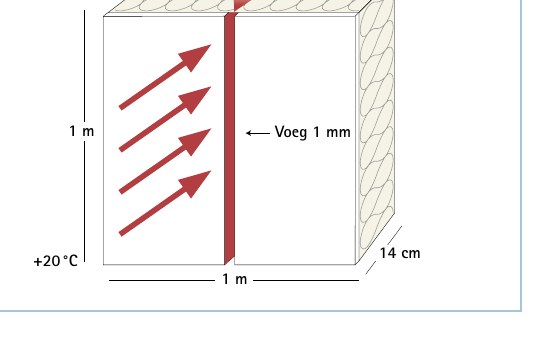
    A single 1 mm gap lets up to 800 grams of moisture per metre of joint into the construction each day. That is 1600 times more than through a properly fitted membrane. Airtightness is not a detail.
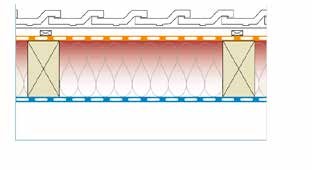
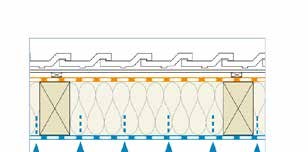
    Airtight layer on the warm side, vapour-open on the outside
    Airtight layer on the warm side, vapour-open on the outside
    A leak in the membrane: warm, moist air flows into the insulation
    A leak in the membrane: warm, moist air flows into the insulation
    A 1 mm gap lets through a lot of moisture, so every seam matters
    A 1 mm gap lets through a lot of moisture, so every seam matters
    Smart membrane: protection in winter, drying out in summer
    Smart membrane: protection in winter, drying out in summer
    Moisture can dry back inwards in summer
    Moisture can dry back inwards in summer

    2. Materials, tools and sizing

    MaterialAmountPurpose
    Intello Plus membrane (1.50 or 3.00 m)m² + 20%The vapour membrane
    Double-sided tape (e.g. Duplex)Along every rafterTemporary fixing, instead of staples
    Tescon Vana tape 60 mm1 roll per 30 m²Overlaps and joints on timber
    Orcon F sealant2 tubes per 30 m²Joints on brick, concrete and plaster
    Tescon Profect / Contega SLPer windowWindow corners and gaps at frames
    Roflex / Kaflex grommetsPer penetrationCables and pipes through the membrane
    Rafters or studs C24See tableSupporting structure
    Battens according to purlin span table (C18)300 mm centresHold membrane and insulation, base for plasterboard
    Screws 35-40 mmPer crossingFixing battens
    Insulation thicknessRcSuitable for
    130 mm3.5Recommended minimum
    150 mm4.0Comfortable and future-proof
    185 mm5.0Near energy-neutral
    222 mm6.0Passive house level
    Purlin spanInsulation thicknessRafterCentres
    1.05 mup to 200 mm21 x 58 mm300 mm
    1.05 mfrom 200 mm28 x 58 mm300 mm
    1.50 mup to 200 mm28 x 70 mm (or 28 x 58)300 mm (or 200)
    Wall insulation thicknessStudNote
    80 - 100 mm44 x 69 mmAnchoring to wall required
    100 - 140 mm38 x 100-120 mm (SLS)Most common
    140 - 220 mm38 x 140-195 mmHeavy construction

    Tools: screwdriver, sealant gun, cutter, tape measure, level with a metal straightedge over 2 m and a pressure roller. Span of 1.50 m? Call us first, structural advice is needed.

    3. Inspection before anything else

    • Purlins and rafters are sound and load-bearing.
    • No moisture, mould or active leaks.
    • Check for a vapour-open windproof layer outside. If there is none, the inner membrane is even more important.
    • Gaps larger than 5 mm are sealed beforehand.
    • Timber moisture below 20% (use a moisture meter).
    • Walls: at least one brick thick (approx. 21 cm), no rising damp. Remove cement render and synthetic finishes.
    • Flue: enclosure of non-combustible material filled with stone wool, keep the manufacturer's clearance. Cellulose withstands up to 70 °C.
    Moisture problem? Stop. Fix the cause first and let it dry to below 20% timber moisture.

    4. Levelling

    All purlins or studs must lie in one plane. An uneven plane causes bulges, gaps and a crooked finish later.

    1. 1Pick the most protruding purlin as reference.
    2. 2Lay the metal straightedge across the purlins and find the low spots.
    3. 3Pack low purlins with a batten until the straightedge touches everywhere.
    4. 4Maximum deviation 3 mm. Packing more than 50 mm? Call us first.
    5. 5Walls: plates on floor and ceiling, hammer plugs at 500 mm, studs at 600 mm, 10 mm clear of the wall.

    5. Fitting the membrane, without staples

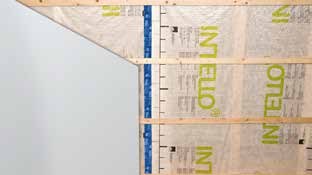
    The printed side faces you. Roll out bottom to top (roof) or left to right (wall).

    1. 1Measure the length and add 40 mm at both edges for the connection.
    2. 2Apply double-sided tape to the rafters or studs.
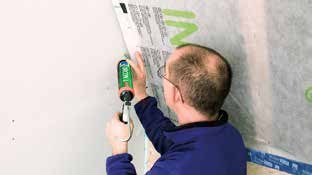
    3. 3Press the membrane taut onto the tape, no creases or sagging. Do not staple.
    4. 4Next strip with 100 mm overlap, use the printed lines.
    5. 5Screw the battens onto the membrane as soon as possible (step 7). They hold it during blowing.
    6. 6Wrap window reveals fully and tape them to the frame.
    The membrane says stapling is allowed. For blown-in insulation we advise against it: blowing pressure tears staples out and creates holes in the airtight layer. Already stapled? Cover every staple with Tescon Vana.
    Membrane with the battens screwed on straight away
    Membrane with the battens screwed on straight away

    6. Sealing joints, edges and corners

    The most important step: around 80% of air leaks are here. Take your time.

    • Overlaps: Tescon Vana centred on the overlap, crease-free, rubbed down firmly with the roller.
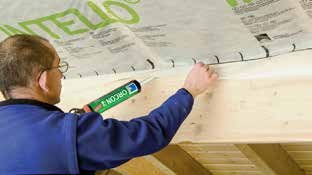
    • Brick, concrete or plaster: dust-free surface, a 10-15 mm bead of Orcon F, press the membrane in within 10 minutes with a small loop.
    • Timber: tape half on timber and half on membrane, or Orcon F on uneven timber.
    • Corners: Tescon Profect, stick one leg first, then the second.
    • Floor to wall junction: lay a waiting strip of membrane, so no draught enters the insulation via the floor joint.
    • Tape sticks poorly below 5 °C or on dust and moisture.
    Taping the membrane overlap
    Taping the membrane overlap
    Press the tape firmly with the applicator
    Press the tape firmly with the applicator
    Smooth the tape, no creases
    Smooth the tape, no creases
    Applying sealant at the wall junction
    Applying sealant at the wall junction
    Sealant bead on the timber for the junction
    Sealant bead on the timber for the junction
    Pressing the membrane into the sealant at the junction
    Pressing the membrane into the sealant at the junction
    Neatly taping corners and junctions
    Neatly taping corners and junctions
    Sealing penetrations with a grommet
    Sealing penetrations with a grommet

    7. Fitting battens (before blowing)

    • Battens according to the purlin span table in step 2 (21 x 58 mm, 28 x 58 mm or 28 x 70 mm), at least C18, perpendicular to purlins or studs.
    • 300 mm centres (max. 500 mm).
    • Screw at every crossing, screws at least 35 mm.
    • This creates approx. 20 mm service space for wiring.
    Battens along the edges do not replace sealant and tape. Seal first, then fit battens.

    8. Preparing the wiring

    • Make a wiring plan first to avoid holes.
    • Cables in the 20 mm space between battens, clips on the batten and never on the membrane.
    • Water and heating pipes do not belong in the service space.
    • Back boxes on the batten or on blocks, flush with the finish.
    • Every penetration with a Roflex grommet, never just cut a hole. Bundle cables.
    • No recessed spotlights: choose surface spots or LED panels.

    9. Ready for our visit

    • Rooms empty and easy to reach.
    • 2 x 230 V on different circuits (16 A).
    • We make the blowing holes (approx. 1 per 3-4 m²) and tape them crosswise and square afterwards.
    • On walls the holes are in the top third and we check extra near the floor.
    • The membrane may bulge slightly, but not stretch excessively.

    Start with the plasterboard within 48 hours of blowing. Do not use OSB, plywood or underlayment: they block the membrane. Plasterboard or vapour-open wood fibre board is fine.

    10. Quality and common mistakes

    MistakeSolution
    Membrane stapledNo staples when blowing. Double-sided tape and battens straight away.
    Membrane not tautPull tighter, battens at 300 mm.
    Overlap poorly tapedRub down fully with the roller.
    Edges poorly sealedEnough sealant, take your time.
    Penetration not sealedAlways grommet, tape or sealant.
    OSB or plywood as finishVapour-open boards only.
    Poor levellingMetal straightedge, max. 3 mm deviation.
    Small tear in membraneUp to 10 mm: Tescon Vana 50 mm over it. Larger: sealant plus tape.

    Test yourself with a smoke pencil under low pressure: if smoke is drawn in, there is a leak. A blower door test gives a hard measurement.

    Frequently asked questions

    Unsure about something?

    Call or message us. Better to check now than have a problem later.

    Alice

    Cookies on Isoleerbewust.nl

    We use functional cookies to make the website work properly and analytical cookies to understand our traffic. We place no tracking or advertising cookies.

    Read our privacy policy for more information.